Features
| Feature | Supported | Notes |
|---|---|---|
| Set pipeline frequency | Yes | For more details, see the guide. |
| Full load synchronization | Yes | |
| Incremental synchronization | No | |
| OAuth connection | Yes |
❗ Ad Blockers
Extensions that block advertising-related content, such as AdBlock or Ghostery, may cause difficulties. In these cases, disable the blocker or add Dadosfera to the extension's allowlist.
Quick Start
To create a pipeline, open the Collect module, go to "Pipelines", and click "New Pipeline".
Choose the Data Source
Use an existing source or register a new one
Pipeline Information
Assign a name and a brief description to your pipeline.
Pipeline Configuration Parameters
| Field name | Description | Example |
|---|---|---|
| Customer ID | Google Ads Console customer ID. This must be the top-level customer. | 123-456-7890 |
| Customer login ID | Login ID of the customer with access to the customer ID. These may be the same, but need not be, since this can be a manager account. | 123-456-7890 |
| Start date | Determines how much historical data will be extracted. | dd/mm/aaaa |
The customer ID appears in the top menu. The login ID appears below it when you expand your account menu.
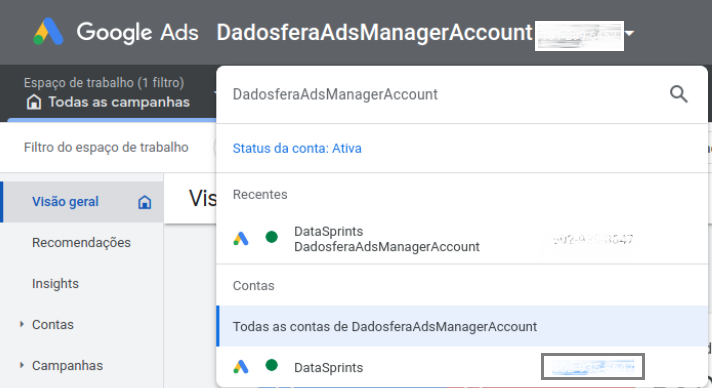
For more information, see this guide.
Click "Save and Continue".
Specify Entities
After entering the credentials, you can view and select the entities and columns from the connected source to import during data collection.
You can also define the synchronization mode per entity. For more information, see the guide.
📘
When selecting more than one entity, a separate dataset is created in the catalog for each imported table or view.
Frequency
- Finally, configure how often your pipeline should run. Choose one of the available options or enter a custom frequency using a cron expression. For more information, see the guide.
📘
The default time zone for scheduling is UTC.
All frequency methods define when extractions begin. They do not control how long replication runs or when the data actually reaches its destination.
Done! Wait for collection to run on the scheduled day and time.
To run the pipeline immediately, you can start it manually within 30 seconds after creating it. Go to "Pipelines", "List", and "Synchronize Pipeline".
After a few minutes, your pipeline will be cataloged as a Data Asset in the Explore tab.
You can also open "View pipeline" in the pipeline list to review the summary, collected entities and columns, execution history, and micro-transformation history.