Tutorials | Process
Creating a Project
You can start a project in three ways:
- Create a new project.
- Import an existing project.
- Import examples curated by Dadosfera or the community.
Creating and Configuring Pipelines
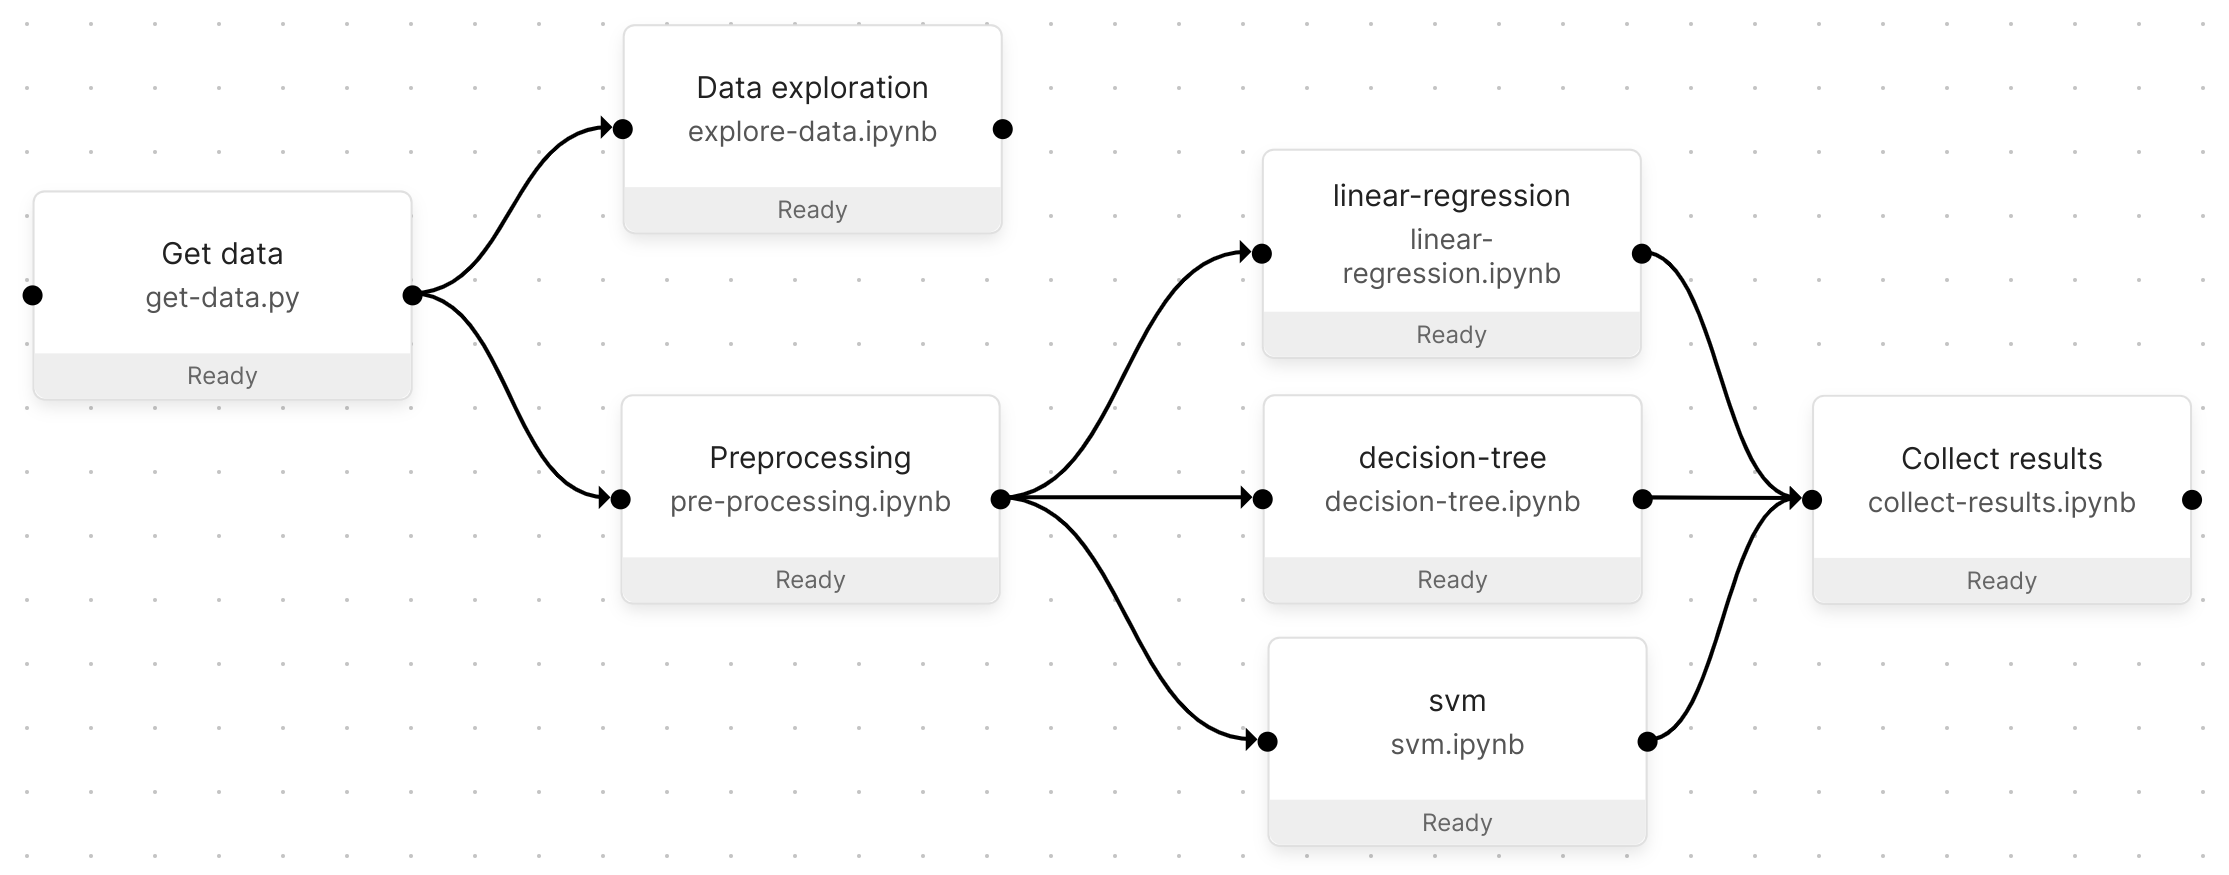
Pipelines are an interactive tool for creating and experimenting with your data workflow in the module. A pipeline consists of steps and connections:
- Steps are executable files that run in their own isolated environments.
- Connections link steps to define how data flows (see data passing) and the order in which steps execute.
Pipelines are edited visually and stored as JSON in the pipeline definition file. This allows pipeline changes (for example, adding a step) to be versioned.
Parameterizing Pipelines
Pipelines use parameters as inputs (for example, the data source connection URL) to vary their behavior. Jobs can use different parameters across multiple runs of the same pipeline. Parameters can be defined in the visual pipeline editor.
You can define pipeline parameters at two levels:
- Pipelines: parameters and their values are available to all pipeline steps.
- Pipeline steps: parameters are only available in the steps where they are defined.
Editing pipeline parameters
- Open a pipeline using Pipelines in the left menu panel.
- Click the three dots in the upper-right corner and select "Pipeline Settings".
- In the menu that opens, find the pipeline parameters section ("parameters") on the right.
- Enter JSON in the structure shown:
"chave : valor," como \{"my-param": <param-value>}. - Make sure to save at the bottom of the screen.
Editing pipeline step parameters
- Open a pipeline using Pipelines in the navigation bar.
- Click a pipeline step to open its properties.
- At the bottom of the "Properties" tab, find the Parameters ("parameters") section.
- Enter JSON in the structure shown:
"chave : valor", como \{"my-param": <param-value>}.
Creating Environments
Environments define the conditions in which pipeline steps execute scripts and kernels. Environments are:
- Selected in the pipeline step properties panel in the pipeline editor.
- Configurable through the setup script (on the environments page) to install additional packages.
- Versioned and owned by a single project.
Choosing a programming language in Dadosfera
An environment uses a single programming language to avoid overloading the container image with too many dependencies. The module includes support for environments in these languages:
- Python
- R
- JavaScript
- Julia
Each environment supports Bash scripts to invoke any other language indirectly. For example: Java, Scala, Go or C++.
To create the environment:
- Go to the Environments page.
- Create a new environment.
- Choose an environment name.
- Choose a base image.
- Choose one of the supported languages.
- Add installation commands for additional packages to the environment setup script.
- Press Build.
Scheduling jobs for your pipeline
After creating the pipeline, writing the files, configuring its steps and setting up environments, you need to run it. You can run a pipeline in the pipeline editor or through Jobs. The former makes testing easy during development, while Jobs lets you run your production pipeline on a recurring schedule (for example, daily). See the complete scheduling tutorial below.
Prerequisites
- Access to the Transformation Module.
- The Snowflake account's Connection_parameters.
Step by step:
Running a parameterized job is very similar to running a job without parameters. After following either procedure above to parameterize your pipeline:
- Make sure you have defined the pipeline's basic parameters.
- Click Jobs in the left menu panel.
- Click + new job to configure your job.
- Choose a Job name and the pipeline the job should run.
- Your default parameter set is preloaded. Clicking the values opens a JSON editor, allowing you to add additional values for the pipeline to use.
- To schedule the job to run at a specific time, see Scheduling.
- Press Run job.
Guided tour:
Importing the Snowpark version of the Dadosfera library
An intuitive library for querying and processing data at scale in Snowflake. Snowflake currently provides Snowpark libraries for three languages: Java, Python and Scala, complementing Snowflake's original SQL interface.
To import the library into the Dadosfera Transformation Module, follow these steps:
1 - Create a folder named dadosfera at the project root.
2 - Create a file named snowflake.py inside the dadosfera folder.
3 - Place this content in the file:
import os
import pandas as pd
from snowflake.snowpark import functions as F
import orchest as utils

connection_parameters = {
    "user": os.environ.get('SNOWFLAKE_USER'),
    "password": os.environ.get('SNOWFLAKE_PASSWORD'),
    "account": os.environ.get('SNOWFLAKE_ACCOUNT'),
    "warehouse": 'COMPUTE_WH',
    "database": os.environ.get('SNOWFLAKE_DATABASE'),
    "schema": 'PUBLIC',
}


def create_pandas_df(snowpark_df):
    rows = snowpark_df.collect()

    data = []
    for row in rows:
        data.append(row.as_dict())

    df = pd.DataFrame(data)
    for column in df.columns:
        df = df.rename({column: column.lower()}, axis=1)

    return df

def remove_quotes_from_columns(df, columns):
    clean_function = [
        F.trim(F.replace(column, '"', ''))
        for column in columns
    ]

    df = df.with_columns(columns, clean_function)
    return df

def empty_string_as_null(df, columns):
    empty_string_as_null_columns = [
        f"nullif({column}, '') as {column}"
        for column in columns
    ]

    df = df.selectExpr(*empty_string_as_null_columns)
    return df
📘
If you do not yet have your Snowflake account's connection_parameters, request them from suporte@dadosfera.ai.
4 - Variables can be set at pipeline level as follows:
Click ... -> Pipeline Settings -> Environment Variables
5 - Restart the notebook kernel so that the new variables take effect.
6 - Restore the session.
The library is now ready to use.
Configuring notifications
You can receive webhook notifications when specific events occur in the module, for example when a task fails. Whenever an event is triggered, Dadosfera sends an HTTP request to your chosen endpoint with an information payload. For example:
{
  "delivered_for": {
    "name": "Test webhook",
    "verify_ssl": false,
    "content_type": "application/json",
    "uuid": "a1edb89c-1cfb-4086-8f75-ab073612c5bf",
    "type": "webhook"
  },
  "event": {
    "type": "ping",
    "uuid": "08bd2a31-9b17-4d1b-83ba-b4538a970dee",
    "timestamp": "2022-06-02 16:12:25.242592+00:00"
  }
}
To create a webhook, go to "Notification settings". The webhook dialog asks for the following:
- Webhook URL: where Dadosfera sends HTTP requests. Enable incoming webhooks in the desired channel (for example, Slack) and check the connection with the "Test" button.
- Content type: application/json (default) or application/x-www-form-urlencoded.
- Webhook name (optional): a custom name for your webhook. This is useful when creating several webhooks with similar URLs.
- Secret (optional): a secret string you can use to verify the request origin (see {ref}below <secure_webhook>).
Verifying the webhook
The following example verifies whether the payload signature matches the signature expected from the stored webhook secret:
import hashlib
import hmac
import os


def verify_signature(payload, request_headers):
    """
    Verifica se a assinatura do payload é a mesma
    que a esperada pelo segredo do webhook armazenado.
    """
    if not isinstance(body, bytes):
        body = body.encode("utf-8")
    digest = hmac.new(
        os.environ["WEBHOOK_SECRET"].encode("utf-8"),
        body,
        hashlib.sha256
    )
Enabling JupyterLab extensions
AI Magic Function - Connecting Jupyter Notebook to ChatGPT
Install the following packages in the Orchest environment:
- jupyter_ai_magics
- jupyter_ai
Building the environment
- Go to the Environments section of your project, as shown below:
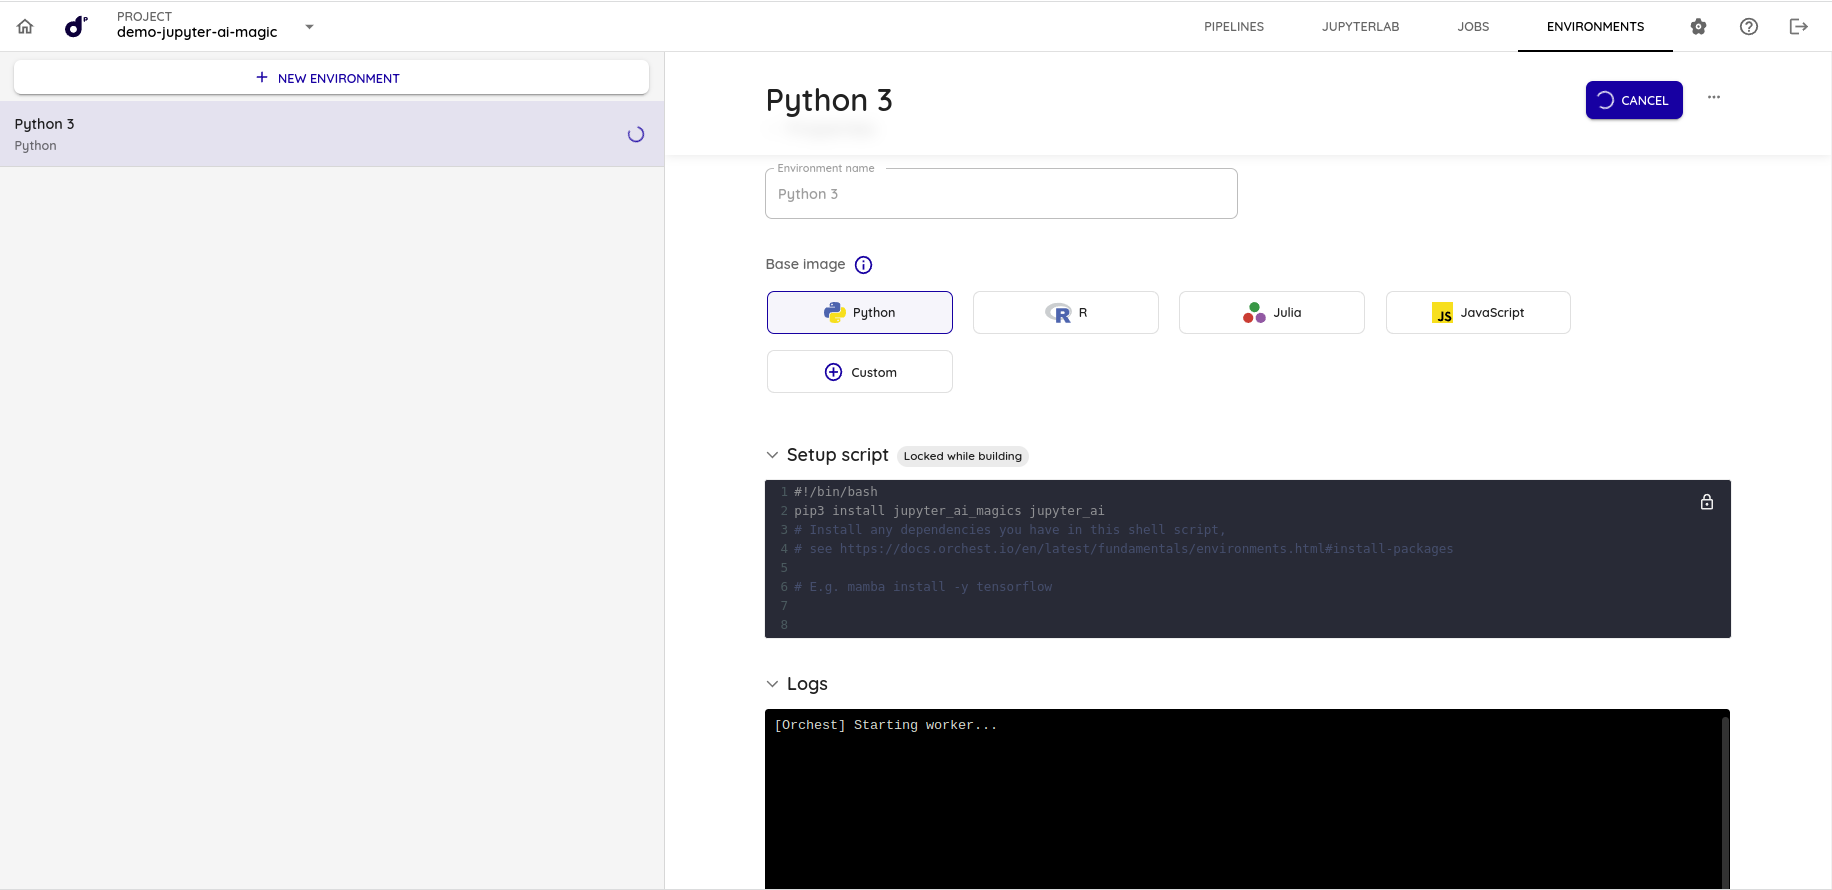
- Add the following code to the script that runs when building the environment:
pip3 install jupyter_ai_magics jupyter_ai
- Build the environment by clicking Build.
- Wait for the environment build to complete.
Setting up OpenAI keys
- In the upper-right corner, click the "..." menu.
- Click Pipeline Settings.
- Click Environment Variables.
- Add an environment variable named
OPENAI_API_KEYcontaining an OpenAI API access key. - Restart the project session.
Setting up JupyterLab
- Open JupyterLab by clicking JUPYTERLAB in the upper-right corner.
- Create a Jupyter Notebook.
- Add the following code to a code cell and run it to load the extension.
%load_ext jupyter_ai
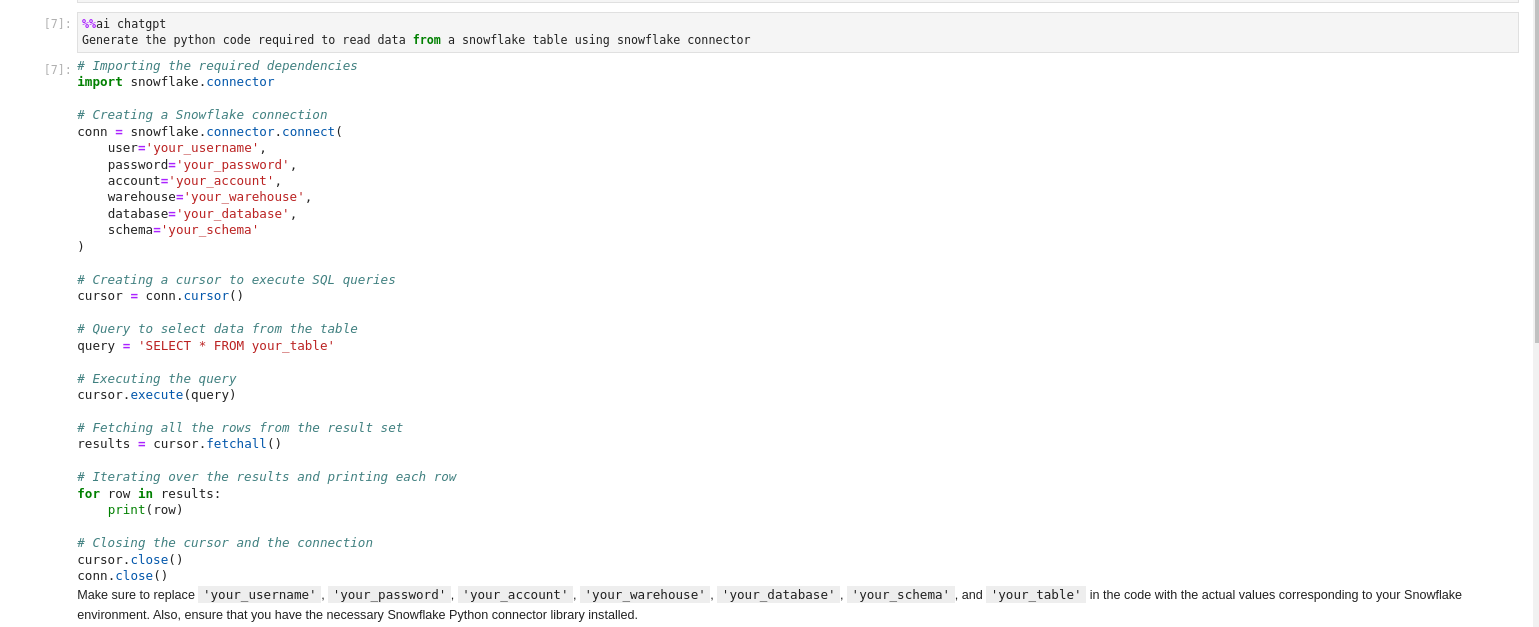
- To ask ChatGPT questions from Jupyter Notebook, use the magic function
%%ai chagpt, as shown below:
Jira Transformation Pipeline
Suppose you have a sample JSON object from Jira and want to unpack it into individual fields to make the data easier to analyze and query.
Dictionaries
 "customfield_10415": {
      "accountId": "5f8a0deb9dbd090069d0f270",
      "accountType": "atlassian",
      "active": true,
      "avatarUrls": {
        "16x16": "https://avatar-management--avatars.us-west-2.prod.public.atl-paas.net/5f8a0deb9dbd090069d0f270/36248fd2-fd48-4390-b010-3a441b4853e3/16",
        "24x24": "https://avatar-management--avatars.us-west-2.prod.public.atl-paas.net/5f8a0deb9dbd090069d0f270/36248fd2-fd48-4390-b010-3a441b4853e3/24",
        "32x32": "https://avatar-management--avatars.us-west-2.prod.public.atl-paas.net/5f8a0deb9dbd090069d0f270/36248fd2-fd48-4390-b010-3a441b4853e3/32",
        "48x48": "https://avatar-management--avatars.us-west-2.prod.public.atl-paas.net/5f8a0deb9dbd090069d0f270/36248fd2-fd48-4390-b010-3a441b4853e3/48"
      },
Arrays
"attachment": [
      {
        "author": {
          "accountId": "6378fc76489de2f7f4629a82",
          "active": false,
          "avatarUrls": {
            "16x16": "https://avatar-management--avatars.us-west-2.prod.public.atl-paas.net/6378fc76489de2f7f4629a82/35cb0e2a-9389-4df0-9fa7-cee86bb94779/16",
            "24x24": "https://avatar-management--avatars.us-west-2.prod.public.atl-paas.net/6378fc76489de2f7f4629a82/35cb0e2a-9389-4df0-9fa7-cee86bb94779/24",
            "32x32": "https://avatar-management--avatars.us-west-2.prod.public.atl-paas.net/6378fc76489de2f7f4629a82/35cb0e2a-9389-4df0-9fa7-cee86bb94779/32",
            "48x48": "https://avatar-management--avatars.us-west-2.prod.public.atl-paas.net/6378fc76489de2f7f4629a82/35cb0e2a-9389-4df0-9fa7-cee86bb94779/48"
          },
          "displayName": "Aline Amaral",
          "self": "https://dadosfera.atlassian.net/rest/api/2/user?accountId=6378fc76489de2f7f4629a82",
          "timeZone": "America/Sao_Paulo"
        },
        "content": "https://dadosfera.atlassian.net/rest/api/2/attachment/content/14989",
        "created": "2023-01-23T16:55:18.458000Z",
        "filename": "[JUR - CONT - RES - DOC098] - Contrato_de_Prestação_de_Serviços_e_lincenciamento _de_software_UnimedVR X DataSprints .pdf",
        "id": "14989",
        "mimeType": "application/pdf",
        "self": "https://dadosfera.atlassian.net/rest/api/2/attachment/14989",
        "size": 1792848
      }
]
To unpack the dictionary shown, include the corresponding data keys in the query. Using Snowflake and SQL, the code would be:
Dictionaries
SELECT
     fields:customfield_10415:accountId AS customfield_10415_accountId,
     fields:customfield_10415:accountType AS customfield_10415_accountType,
     fields:customfield_10415:active AS customfield_10415_active,
     fields:customfield_10415:avatarUrls:"16x16" AS customfield_10415_avatarUrls_16x16,
     fields:customfield_10415:avatarUrls:"24x24" AS customfield_10415_avatarUrls_24x24,
     fields:customfield_10415:avatarUrls:"32x32" AS customfield_10415_avatarUrls_32x32,
     fields:customfield_10415:avatarUrls:"48x38" AS customfield_10415_avatarUrls_48x48,
     fields:customfield_10415:displayName AS customfield_10415_displayName,
     fields:customfield_10415:self AS customfield_10415_self,
     fields:customfield_10415:timeZone AS customfield_10415_timeZone
FROM public.tb__fqtpnb__issues
Arrays
SELECT
    fields:attachment:author:accountId AS attachment_author_accountId,
    fields:attachment:author:active AS attachment_author_active,
     fields:attachment:author:avatarUrls:"16x16" AS attachment_author_avatarUrls_16x16,
     fields:attachment:author:avatarUrls:"24x24" AS attachment_author_avatarUrls_24x24,
     fields:attachment:author:avatarUrls:"32x32" AS attachment_author_avatarUrls_32x32,
     fields:attachment:author:avatarUrls:"48x38" AS attachment_author_avatarUrls_48x48,
     fields:attachment:author:displayName AS attachment_author_displayName,
     fields:attachment:author:self AS attachment_author_self,
     fields:attachment:author:timeZone AS attachment_author_timeZone,
     fields:attachment:content AS attachment_content,
     fields:attachment:created AS attachment_created,
     fields:attachment:filename AS attachment_filename,
     fields:attachment:id AS attachment_id,
     fields:attachment:mimeType AS attachment_mimeType,
     fields:attachment:self AS attachment_self,
     fields:attachment:size AS attachment_size
FROM public.tb__fqtpnb__issues
This SQL code unpacks the information in the JSON customfield_10415 field, making it accessible in individual columns for easier manipulation and analysis in Snowflake. Adjust it as needed for your specific configuration.
The same logic applies to the other fields.