Introduction
What it does
Create notebooks and data models visually and intuitively using Python, R, Julia, JavaScript or Bash for descriptive and predictive analysis.
Watch a short demonstration of our Intelligence and Advanced Analytics Module:
Features
Structuring and orchestrating data science pipelines.
Build data science pipelines interactively in our visual pipeline editor. Versioned as a JSON file.
Code scripts and notebooks
Run scripts or Jupyter notebooks as pipeline steps. Python, R, Julia, JavaScript and Bash are supported.
Execution jobs
Parameterize pipelines and run them periodically on a cron schedule.
Environments
Install packages easily. Built on standard Docker container images.
Below is a short technical tutorial video for the Intelligence and Advanced Analytics Module covering:
- Creating a new project;
- Introducing the Pipelines tab interface and how to create pipelines;
- Introducing the settings menu;
- Introducing the Environments menu interface;
- Introducing the Jobs menu interface and creating a notebook in JupyterLab;
- Running a Data App and creating a data asset from it directly in the Dadosfera catalog.
Limitations
📘
Check whether your company's plan includes access to the Intelligence Module.
This module is partly separate from Dadosfera's other native modules because it has dedicated infrastructure to operate as efficiently as possible.
This module is currently offered in English only.
Concepts
At a high level, all module pages are simply "views" of files in the file system. In detail:
Projects
Apart from global settings and authentication, everything in the module is encapsulated in Projects. Think of a project as a folder in your file system containing files.
Files
A project can contain as many executable files as needed. These can be Python files, notebooks and R files.
Pipelines
Pipelines are another important Dadosfera concept. A pipeline connects multiple steps that determine execution order and continue working on the resulting data. The complete pipeline description is stored in a single JSON file, so pipelines can be fully versioned and you can track any changes made to them.
Environments
Because the module is fully containerized, all code must run inside a container. Since code may require additional dependencies (such as libraries), the container, or more precisely its underlying image, must be configured for your needs. You can fully customize container images using a setup script that we create automatically for you. This is what we call an Environment.
Jobs
After creating a pipeline, writing its files, configuring its steps and setting up environments, you need to run it. Use the pipeline editor for easy testing during development, or Jobs to execute your pipeline in production on a recurring schedule (for example, daily). See the complete scheduling tutorial here.
Keyboard shortcuts
| Key | Action |
|---|---|
| Space + click + drag | Pan canvas * |
| Scroll up/down | Pan the canvas up/down * |
| Scroll left/right | Pan the canvas left/right * |
| Shift + scroll up/down | Pan the canvas left/right * |
| Shift + scroll left/right | Pan the canvas up/down * |
| Ctrl (or ⌘) + scroll up/down | Zoom in/out * |
| Ctrl + click | Select multiple steps |
| Ctrl + A | Select all steps * |
| Ctrl + Enter | Run selected steps * |
| H | Center view and reset zoom |
| Escape | Deselect steps |
| Delete/Backspace | Delete selected step(s) |
| Double click a step | Open file in JupyterLab |
General settings
The module is configured through Settings. Some settings require a module restart before changes take effect. For example:
{
  "AUTH_ENABLED": false,
  "MAX_BUILDS_PARALLELISM": 1,
  "MAX_INTERACTIVE_RUNS_PARALLELISM": 4,
  "MAX_JOB_RUNS_PARALLELISM": 4,
  "TELEMETRY_DISABLED": false,
  "TELEMETRY_UUID": "69b40767-e315-4953-8a2b-355833e344b8"
}
- AUTH_ENABLED: Enables authentication. When enabled, Dadosfera requires a login. Create user accounts through Settings > User management. Dadosfera does not yet support individual user sessions, meaning there is no granularity or security between users. (Boolean: true or false)
❗️
Authentication is enabled by default. We do not recommend disabling it and exposing the module to any user without a login.
- MAX_BUILDS_PARALLELISM: Controls the total number of environment and JupyterLab image builds that can run in parallel. (Integer in: [1, 25])
- MAX_INTERACTIVE_RUNS_PARALLELISM: Controls how many interactive pipeline runs can run in parallel for different pipelines at a given time. For example, setting this to 2 allows only 2 different pipelines to have interactive runs simultaneously. This is useful when multiple users use Dadosfera. (Integer in: [1, 25])
- MAX_JOB_RUNS_PARALLELISM: Controls how many job runs can run in parallel across all jobs. For example, setting this to 3 allows only 3 pipeline runs in parallel. (Integer in: [1, 25])
- TELEMETRY_DISABLED: Disables telemetry. (Boolean: true or false)
- TELEMETRY_UUID: UUID for tracking usage across user sessions.
Module Access
Because its infrastructure is separate from Dadosfera's other native modules, access and management for the Processing Module are not currently integrated with Dadosfera access management. See below for how to manage access to this module:
📘
We strongly recommend individual logins for Dadosfera access, enabling better permission control and auditing.
Dadosfera does not limit the number of users per customer.
First Access
Dadosfera support emails the organization's Super Admin the initial access credentials once the module is purchased. After this initial access, the organization manages access itself.
Access Management
Creating users
- Open your environment.
- On the home page, go to 'Settings' in the upper-right corner:

- In the left menu, open User management:
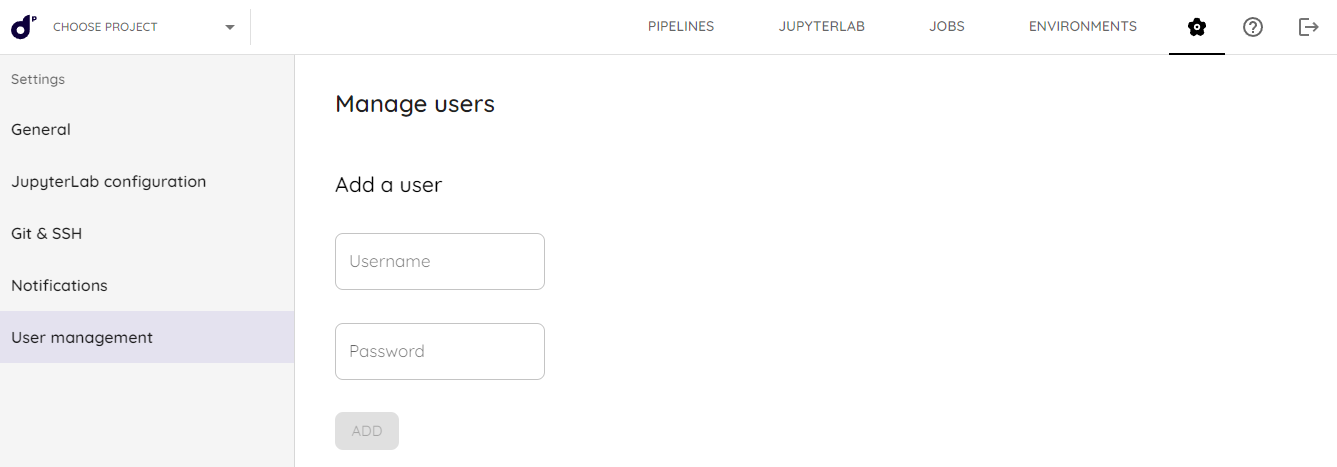
- Set the Username (which can be an email) and Password, then click Add.
- Share the credentials securely.
📘
Dadosfera support provides the first module user account. That user is responsible for subsequent access.
Deleting users
- Open User management.
- Find the user in the Delete users list and click DELETE.
Example Projects
See intelligence-module-examples for scripts demonstrating data modeling use cases in the module. Original datasets are not provided; the scripts are examples only.
📘
These projects will soon be available in the module interface itself.
Tutorials
Creating a Project
You can start in three ways:
- Create a new project.
- Import an existing project.
- Import examples curated by Dadosfera or the community.
Creating and Configuring Pipelines
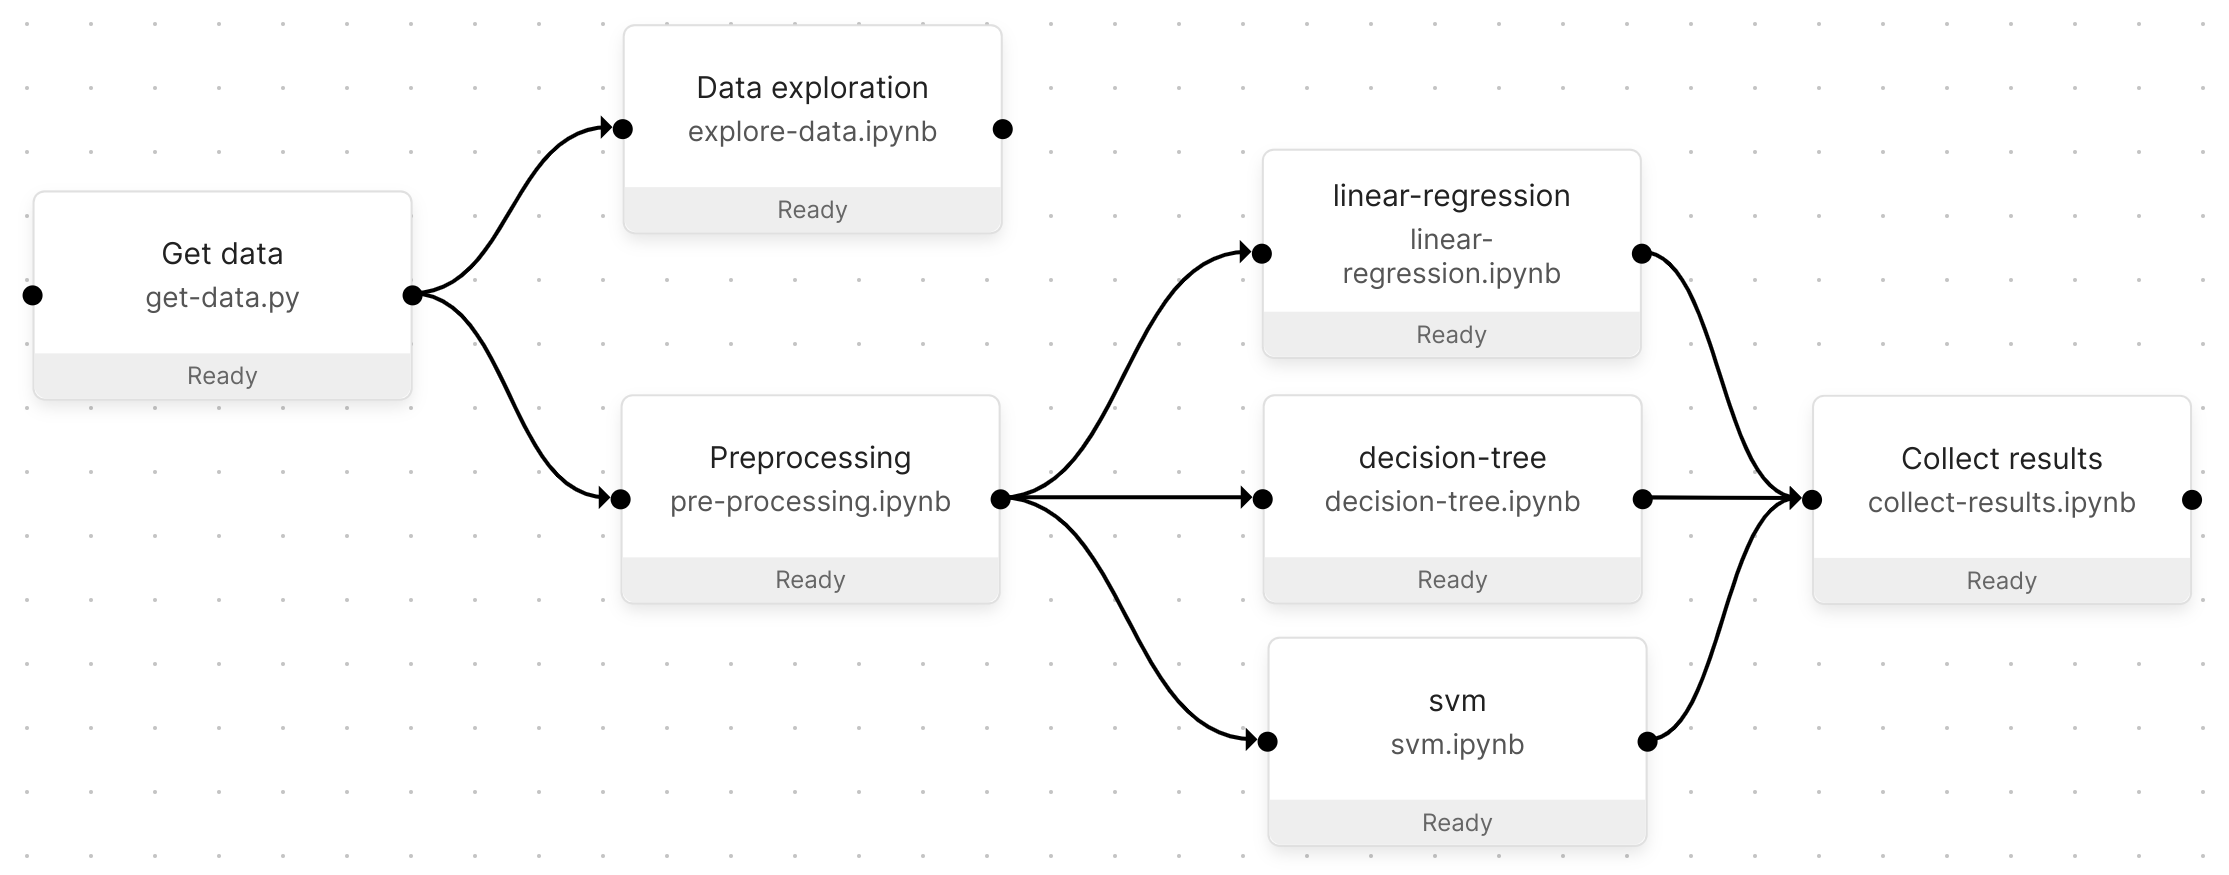
Pipelines are an interactive tool for creating and experimenting with data workflows in the module. They consist of steps and connections:
- Steps are executable files that run in their own isolated environments.
- Connections link steps, defining data flow and execution order.
Pipelines are edited visually and stored in a JSON definition file, allowing changes such as added steps to be versioned.
Parameterizing Pipelines
Pipelines use parameters as inputs (for example, the data source connection URL) to vary their behavior. Jobs can use different parameters across multiple runs of the same pipeline. Parameters can be defined in the visual pipeline editor.
You can define pipeline parameters at two levels:
- Pipelines: parameters and their values are available to all pipeline steps.
- Pipeline steps: parameters are only available in the steps where they are defined.
Editing pipeline parameters
- Open a pipeline using Pipelines in the left menu panel.
- Click SETTINGS in the upper-right corner.
- At the top, find the pipeline parameters section.
- Enter JSON such as
{"my-param": <param-value>}. - Make sure to save at the bottom of the screen.
Editing pipeline step parameters
- Open a pipeline using Pipelines in the navigation bar.
- Click a pipeline step to open its properties.
- At the bottom, find the Parameters section.
- Enter JSON such as
{"my-param": <param-value>}.
Creating Environments
Environments define the conditions in which pipeline steps execute scripts and kernels. Environments are:
- Selected in the pipeline step properties panel in the pipeline editor.
- Configurable through the setup script (on the environments page) to install additional packages.
- Versioned and owned by a single project.
Choosing a programming language in Dadosfera
An environment uses a single programming language to avoid overloading the container image with too many dependencies. The module includes support for environments in these languages:
- Python
- R
- JavaScript
- Julia
Each environment supports Bash scripts to invoke any other language indirectly. For example: Java, Scala, Go or C++.
To create the environment:
- Go to the Environments page.
- Create a new environment.
- Choose an environment name.
- Choose a base image.
- Choose one of the supported languages.
- Add installation commands for additional packages to the environment setup script.
- Press Build.
Scheduling jobs for your pipeline
After creating a pipeline, writing its files, configuring its steps and setting up environments, you need to run it. Use the pipeline editor for easy testing during development, or Jobs to execute it in production on a recurring schedule (for example, daily). See the complete scheduling tutorial below.
Prerequisites
- Access to the Transformation Module.
- The Snowflake account's Connection_parameters.
Step by step:
Running a parameterized job is very similar to running a job without parameters. After following either procedure above to parameterize your pipeline:
- Make sure you have defined the pipeline's basic parameters.
- Click Jobs in the left menu panel.
- Click + new job to configure your job.
- Choose a Job name and the pipeline the job should run.
- Your default parameter set is preloaded. Clicking the values opens a JSON editor, allowing you to add additional values for the pipeline to use.
- To schedule the job to run at a specific time, see Scheduling.
- Press Run job.
Guided tour:
Importing the Snowpark version of the Dadosfera library
An intuitive library for querying and processing data at scale in Snowflake. Snowflake currently provides Snowpark libraries for three languages: Java, Python and Scala, complementing Snowflake's original SQL interface.
To import the library into the Dadosfera Transformation Module, follow these steps:
1 - Create a folder named dadosfera at the project root.
2 - Create a file named snowflake.py inside the dadosfera folder.
3 - Place this content in the file:
import os
import pandas as pd
from snowflake.snowpark import functions as F
import orchest as utils

connection_parameters = {
    "user": os.environ.get('SNOWFLAKE_USER'),
    "password": os.environ.get('SNOWFLAKE_PASSWORD'),
    "account": os.environ.get('SNOWFLAKE_ACCOUNT'),
    "warehouse": 'COMPUTE_WH',
    "database": os.environ.get('SNOWFLAKE_DATABASE'),
    "schema": 'PUBLIC',
}


def create_pandas_df(snowpark_df):
    rows = snowpark_df.collect()

    data = []
    for row in rows:
        data.append(row.as_dict())

    df = pd.DataFrame(data)
    for column in df.columns:
        df = df.rename({column: column.lower()}, axis=1)

    return df

def remove_quotes_from_columns(df, columns):
    clean_function = [
        F.trim(F.replace(column, '"', ''))
        for column in columns
    ]

    df = df.with_columns(columns, clean_function)
    return df

def empty_string_as_null(df, columns):
    empty_string_as_null_columns = [
        f"nullif({column}, '') as {column}"
        for column in columns
    ]

    df = df.selectExpr(*empty_string_as_null_columns)
    return df
📘
If you do not yet have your Snowflake account's connection_parameters, request them from suporte@dadosfera.ai.
4 - Variables can be set at pipeline level as follows:
Click ... -> Pipeline Settings -> Environment Variables
5 - Restart the notebook kernel so that the new variables take effect.
6 - Restore the session.
The library is now ready to use.
Configuring notifications
You can receive webhook notifications when specific events occur in the module, for example when a task fails. Whenever an event is triggered, Dadosfera sends an HTTP request to your chosen endpoint with an information payload. For example:
{
  "delivered_for": {
    "name": "Test webhook",
    "verify_ssl": false,
    "content_type": "application/json",
    "uuid": "a1edb89c-1cfb-4086-8f75-ab073612c5bf",
    "type": "webhook"
  },
  "event": {
    "type": "ping",
    "uuid": "08bd2a31-9b17-4d1b-83ba-b4538a970dee",
    "timestamp": "2022-06-02 16:12:25.242592+00:00"
  }
}
To create a webhook, go to "Notification settings". The webhook dialog asks for the following:
- Webhook URL: where Dadosfera sends HTTP requests. Enable incoming webhooks in the desired channel (for example, Slack) and check the connection with the "Test" button.
- Content type: application/json (default) or application/x-www-form-urlencoded.
- Webhook name (optional): a custom name for your webhook. This is useful when creating several webhooks with similar URLs.
- Secret (optional): a secret string you can use to verify the request origin (see {ref}below <secure_webhook>).
Verifying the webhook
The following example verifies whether the payload signature matches the signature expected from the stored webhook secret:
import hashlib
import hmac
import os


def verify_signature(payload, request_headers):
    """
    Verifica se a assinatura do payload é a mesma
    que a esperada pelo segredo do webhook armazenado.
    """
    if not isinstance(body, bytes):
        body = body.encode("utf-8")
    digest = hmac.new(
        os.environ["WEBHOOK_SECRET"].encode("utf-8"),
        body,
        hashlib.sha256
    )
Sharing code between projects
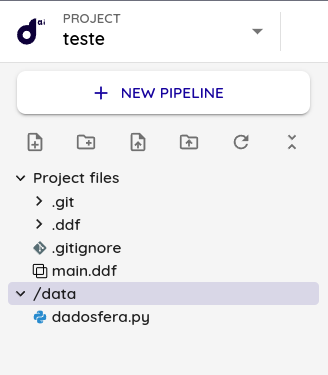
The Intelligence Module has a global directory where you can add code files for use across projects: /data.
To use it, follow these steps:
1. Add the file containing the code to share to the /data directory
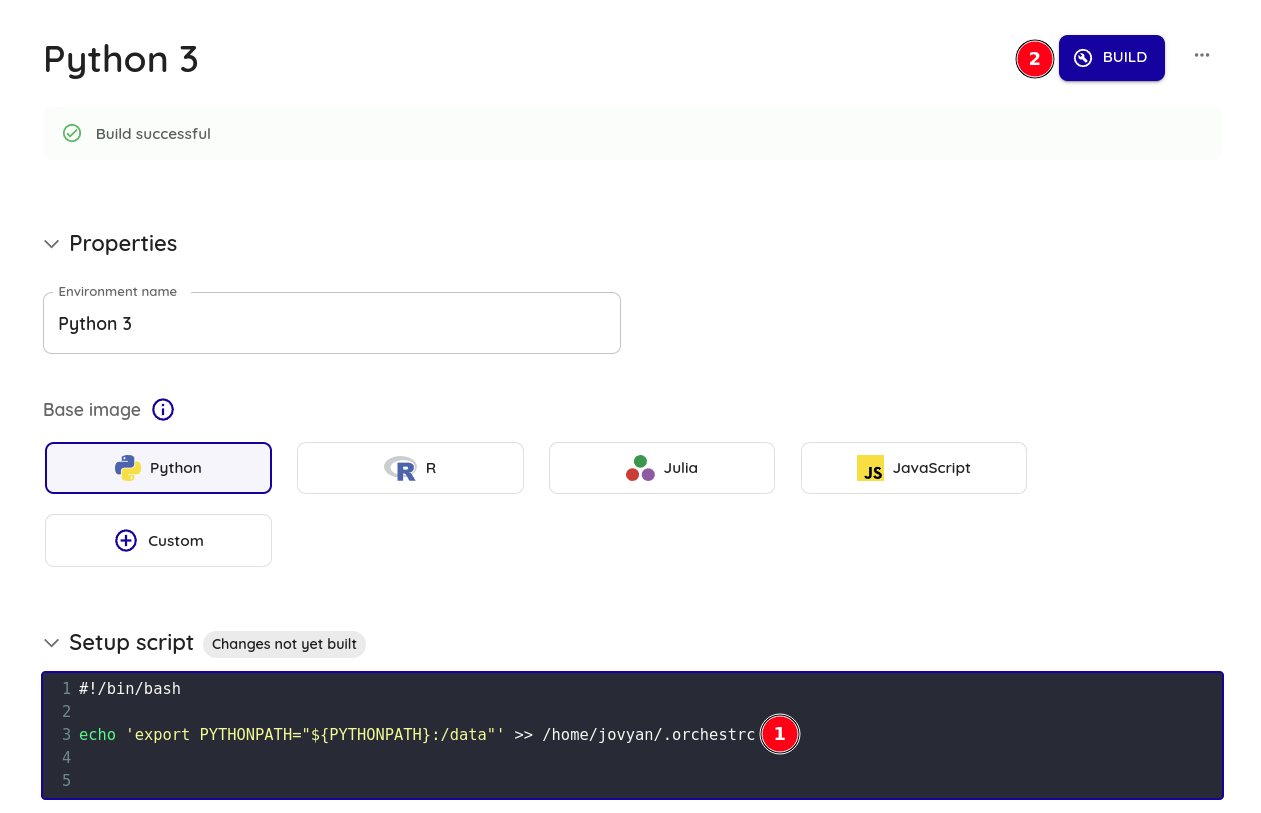
2. Add the following script to the environments where you want to use the file's functions and run the build
echo 'export PYTHONPATH="${PYTHONPATH}:/data"' >> /home/jovyan/.orchestrc
3. Restart your pipeline session
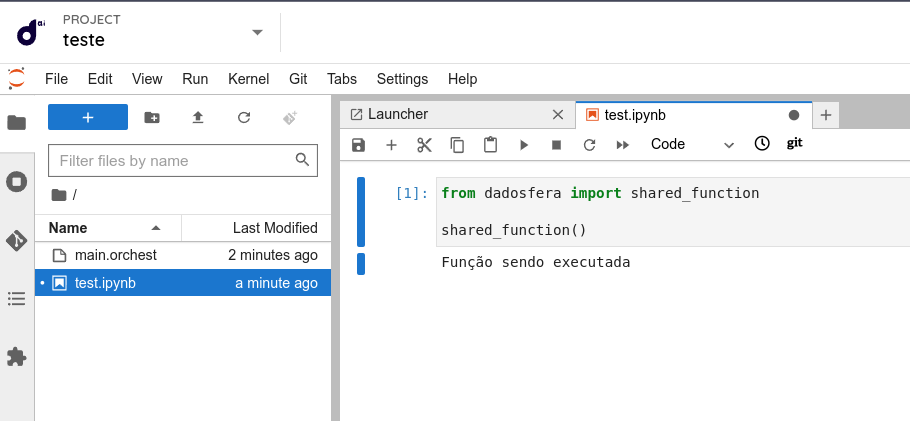
4. Import the file's functions as if it were a library
The import name is the file name. Give it a unique name to avoid conflicts with other libraries.
🚧 Important
Files in
/datacannot be edited. To change a file, move it to your project, make the changes and place it back in/data.